First published online on Jan. 2021 (revised as needed)
Preface
My university moved classes online because of COVID-19 in 2020. I made a lightboard to stick to a chalk talk in my online class in the fall semester. The operation cost (equipment, recording assistant, room space, etc.) of my lightboard is low, perhaps lower than the original and direct spin-offs, thanks to online conference software. I teach online with the lightboard from my office by myself. I don't need studio-grade lighting or a recording assistant to teach online. I share my "light" lightboard experience here.
My university moved classes online because of COVID-19 in 2020. I made a lightboard to stick to a chalk talk in my online class in the fall semester. The operation cost (equipment, recording assistant, room space, etc.) of my lightboard is low, perhaps lower than the original and direct spin-offs, thanks to online conference software. I teach online with the lightboard from my office by myself. I don't need studio-grade lighting or a recording assistant to teach online. I share my "light" lightboard experience here.
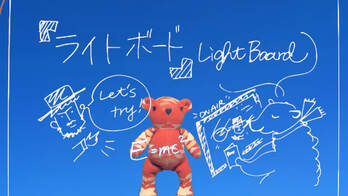 Photo 1. One scene from the lightboard video (view from students).
Video view from students
Photo. 1 is a scene from the lightboard video (a bear doll is placed instead of a teacher writing on the lightboard). In Photo. 1, there is a transparent board between the doll and the webcam, on which the cartoon is drawn. In the real lecture, a teacher would write passages, draws figures, or derives equations there. I link a short sample video (20 seconds) of my lecture here as well. You can find many lightboard videos on the Internet, too. (I cannot find Japanese videos yet as of January 2021.)
Photo. 1 is a scene from the lightboard video (a bear doll is placed instead of a teacher writing on the lightboard). In Photo. 1, there is a transparent board between the doll and the webcam, on which the cartoon is drawn. In the real lecture, a teacher would write passages, draws figures, or derives equations there. I link a short sample video (20 seconds) of my lecture here as well. You can find many lightboard videos on the Internet, too. (I cannot find Japanese videos yet as of January 2021.)
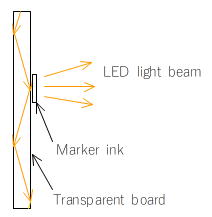 Fig. 1. Cross-sectional view of the lightboard.
How it works: A brief explanation
Fig. 1 illustrates how it works. LED light entering from the edge face of the transparent board bounces back repeatedly inside. It doesn't come out from the board surface (and thus, the entire board doesn't shine) when nothing is written or drawn on the place. If a teacher writes or draws something on the board surface with a fluorescent board marker, the marker ink shines; the student viewing from the opposite side of the board can see it.
A teacher turns his/her back to the students in a regular classroom while writing/drawing on the blackboard. In an online lecture with a lightboard, s/he and the students can face each other across the transparent board while s/he is writing quotes, etc., there.
Flipping the mirrored image
Students would see the mirrored writing across the lightboard at this point. A Live video image captured with a webcam needs to be flipped horizontally before being streamed with online conference software (e.g., Zoom, Google Meet, Cisco Webex) so that the students can see the writings on the lightboard correctly (Photo. 1, Fig. 2). I recode my lecture with a Logitech/Logicool webcam (StreamCam), flip the video image with Logitech/Logicool Capture, and then stream it to the students with Zoom. Broadcaster software such as OBS Studio or XSplit Broadcaster can flip the video image, too (then, we can use webcams from other producers).
Students would see the mirrored writing across the lightboard at this point. A Live video image captured with a webcam needs to be flipped horizontally before being streamed with online conference software (e.g., Zoom, Google Meet, Cisco Webex) so that the students can see the writings on the lightboard correctly (Photo. 1, Fig. 2). I recode my lecture with a Logitech/Logicool webcam (StreamCam), flip the video image with Logitech/Logicool Capture, and then stream it to the students with Zoom. Broadcaster software such as OBS Studio or XSplit Broadcaster can flip the video image, too (then, we can use webcams from other producers).
Filming with a green screen (Chroma keying)
With a little twist, we can improve the video image stream to the students. We use the virtual background function of an online conference or broadcaster software for that. We record the lecture in front of a green screen and replace the green background with a solid-color image (I recommend bluish/greenish color). Students can see letters and figures on the lightboard more clearly (Fig. 1, Photo. 2). We don't necessarily need a green screen for the virtual background; it seems better to have it for a clearer image and lower CPU/GPU power. I use Zoom's virtual background function.
With a little twist, we can improve the video image stream to the students. We use the virtual background function of an online conference or broadcaster software for that. We record the lecture in front of a green screen and replace the green background with a solid-color image (I recommend bluish/greenish color). Students can see letters and figures on the lightboard more clearly (Fig. 1, Photo. 2). We don't necessarily need a green screen for the virtual background; it seems better to have it for a clearer image and lower CPU/GPU power. I use Zoom's virtual background function.
Workflow of an online lecture with a "light" lightboard
All in all, the lightboard lecture reaches the students as follows (Fig. 2):
All in all, the lightboard lecture reaches the students as follows (Fig. 2):
- Capture a lightboard lecture with a webcam. It is recommended to wear dark clothes and film with a green screen for a clearer video image.
- Flip the captured live video horizontally with software. I use logitech/logicool Capture, which comes with some logitech/logicool webcams (I use StreamCam). But other broadcaster software such as OBS Studio or XSplit Broadcaster can do it.
- Input the horizontally-flipped video into Zoom or any online conference software such as Google Meet, Cisco Webex, or Microsoft Teams.
- Change the background of the video with the virtual background function of Zoom etc. I use greenish or bluish PC wallpapers as virtual backgroud image for a clearer video image. With balck wallpaper, we can make the video close to the one taken with the original lightboard.
- Stream the lecture video online to the students.
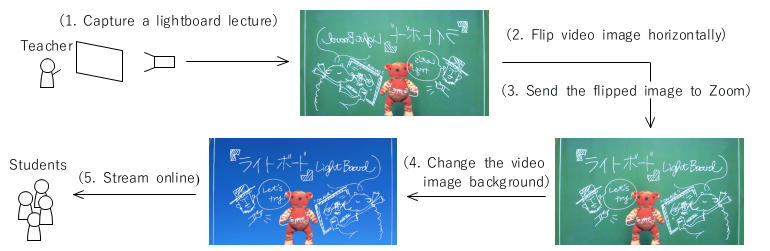
Fig. 2. Online live lecture: From the lightboard to the students.
Assembling a lightboard
My lightboard is initially made as a prototype. I built it to see how the lightboard really works and whether I can use it in online classes. I keep using it after all now.
My lightboard is initially made as a prototype. I built it to see how the lightboard really works and whether I can use it in online classes. I keep using it after all now.
Transparent board and structural material
- I chose the aluminum frame, GF-S (dia. 19mm; URL of the same products in the U.S.) from SUS as a structural material. SUS products seem to one of few aluminum frame products that consumers can buy/order online or hardware stores in Japan. You may find the SUS products or aluminum/steel frame products from other companies at hardware stores or online in your country.
- I use an plexiglass (acrylic board) with W900mm (3ft) x H600mm (2ft) x t3mm. Edge surfaces are mirror-finished for the LED light. Corners are round off to prevent the cut.
- (Costs) Plexiglass (W900mm x H600mm x t3mm) costs 6,000-yen ($60, incl. shipping). Aluminum frame costs 8,000-yen ($80).
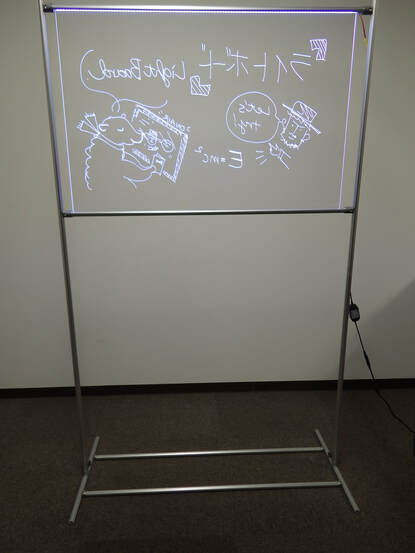 Photo. 2. Lightboard (view from webcam-side. the top of the side poles are out of the image. There are no brace frames between side poles so that I can put a table between them.)
Some remarks about assembling (Photo. 2)
- The transparent board is secured between the top and bottom frames (Green Frame S SS slot) by inserting its edges into their slots.
- The top and bottom frames' length is 950mm (L + 50mm, where L (=900mm) is the width of the transparent board ). The extra 50mm is for wiring of LED strip light (described later) and the connectors (Multi Connector S Outer) that connect these frames and side poles (Green Frame S). The connectors need to be used with connector pieces (SS Slot Connector Piece) to ensure structural strength.
- Side poles are mounted between floor and ceiling as if they were floor-to-ceiling telescopic poles (not shown in Photo. 2).
- In my case, the side poles (Green Frame S, 1,900mm, the longest ones available in Japan) is not long enough to reach the ceiling and support the lightboard. I add a 600mm-long frame (Green Frame S, top pole) to each side pole with a connector (Double Connector S). I attach a pole foot (Foot M6) at the top pole's end with a foot connector (Foot Connector S).
- The frames of the lightboard foot are 450mm long. The foot frames and side poles are connected with the connectors (Multi Connector S Inner) and reinforced with another connector (Point Connector S). The foot frames are reinforced with two 950mm-long frames with the connectors (Multi Connector S Inner) to ensure structural strength.
- There ought to be brace frames between side poles to add structural strength (Photo. 2), which I trade for the convenience to have a table there instead. I need the table to put online teaching gadgets (markers, clocks, etc.) there.
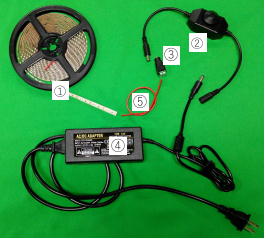 Photo 3. Lighting components.
Lighting components
- I use a 12V 120-led daylight-white 3528 LED strip light for lighting (Part 1 in Photo. 3), which fits the frame slot. The LED strip light is placed to be sandwiched between the upper frame and the transparent board (Fig. 3). It isn't necessary to glue the LED strip light inside the frame slot.
- The LED strip light doesn't need to be waterproof in my lightboard. If it is mounted at the bottom frame, however, it needs to be waterproof. We wipe and clean the lightboard with a damp cloth (described later).
- LED light enters from the edge face of the transparent board. Only LED strip light mounted at the top frame provides (more than) sufficient illumination. A light controller (Part 2) is connected to the LED strip light to adjust the light amount.
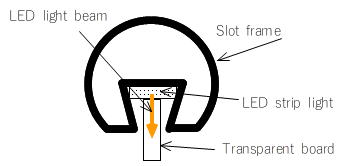 Fig. 3. Top slot frame, LED strip light, and transparent board (cross-sectional view).
- We may need to add a DC power connector (Part 3) to the LED strip light's end to connect with a light controller.
- I use a 12V 6A DC power supply adapter (the power is more than enough to lit the LED strip light of my lightboard).
- It may be necessary to extend the electric wire of the LED strip light. I use AWG20. It is essential to be aware of the allowable ampacity of electric wire you use and make sure that the electric parts are correctly insulated.
- The heat of the LED strip light isn't a problem with my lightboard. The top aluminum frame, which works as a heat sink, gets warm just a little bit after two hours.
- (Cost) Electric components (12V 120-led daylight-white 3528 LED strip light, light controller, 12V AC adapter, DC power plug connector) cost less than 3,000-yen ($30).
PC and software
We need a PC, a webcam, an online conference software (e.g., Zoom), and a broadcaster software (e.g., OBS Studio) to record and/or stream lectures online as well.
We need a PC, a webcam, an online conference software (e.g., Zoom), and a broadcaster software (e.g., OBS Studio) to record and/or stream lectures online as well.
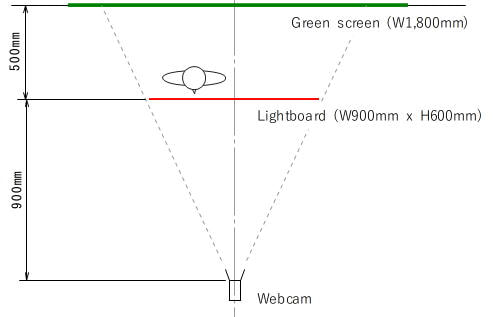 Fig. 4. Lightboard layout
Layout and (no) lighting
Fig. 4 shows the layout of the lightboard. It requires only a small footprint. I can set it up in my office and teach online from there. I don't need studio-grade lighting to teach online, either. The operation cost is low; it is easier to set up and operate it than many lightboards widely used in MOOCs.
Fig. 4 shows the layout of the lightboard. It requires only a small footprint. I can set it up in my office and teach online from there. I don't need studio-grade lighting to teach online, either. The operation cost is low; it is easier to set up and operate it than many lightboards widely used in MOOCs.
Some thought and comments
Ensuring the structural strength
Material choice for the transparent board
(Idea) Diversion of airborne transmission prevention board to the lightboard
Your school may have already installed a transparent board between teachers and students in classrooms. You may be able to convert it to a lightboard by attaching LED strip light with U shaped rubber seal strip (you may need to take care of the heat from LED strip light).
Ensuring the structural strength
- I repeat that there ought to be brace frames between side poles to add structural strength, which I trade for the convenience of having a table there instead.
- It is originally a prototype; I made it with small aluminum frames (dia. 19mm; GF-S from SUS). When I have a chance to make a lightboard again, I will use larger frames as side poles to ensure the structural strength (e.g., GF-N (dia. 28mm) or GF-G (dia. 43mm) from SUS).
- I think it is challenging to build usable desk-top lightboard unless made heavy and/or mounted firmly on the table.
Material choice for the transparent board
- I think we can use only either plexiglass or real glass for the lightboard.
- I use the 3mm-thick plexiglass this time just because I originally made it as prototype. It would be better to use a thicker board (e.g., 5mm thick), especially for a large lightboard. The transparent board bows outwards a little when I write or draw something on it.
- Plexiglass scratch easily. My lightboard has many scratches around two months after using it. However, they don't affect the video (Photo. 1 and a sample movie).
- If we use a ticker plexiglass or a real glass, and/or build a larger lightboard, It will get heavy quickly. We need to be careful about the choice of structural material and structure to prevent accidental falls or other accidents.
(Idea) Diversion of airborne transmission prevention board to the lightboard
Your school may have already installed a transparent board between teachers and students in classrooms. You may be able to convert it to a lightboard by attaching LED strip light with U shaped rubber seal strip (you may need to take care of the heat from LED strip light).
Gadgets and knowhows for the lightboard
Fluorescent board marker ("chalk")
We need to use a fluorescent board marker to make the written characters lit and visible to students. I use "Raymay Fuji Fluorescent Board Marker, Fine Point, White (LBM202W)", which is perhaps the only product widely available in Japan. Buy a fluorescent board marker available in your country. We need to use fine point pens. The ink from medium or bold point pens smudges when it is lit by the LED light beam. I use only white pens. We need the brighter LED light beam to lit colored writing; then the white writing shine too much and gets smudged.
Kitchen paper ("eraser")
Marker ink just sits on the transparent board. We can wipe off the ink after it gets dried. I clean the board with kitchen paper during lectures (two or three sheets for every lecture). After lectures, I wipe the board with a wet, tightly wrung out cloth. No detergent is necessary. Don't use a wet cloth during the lecture to clean the board. If you do so, the entire board glows with spread fluorescent ink. A soft cloth is preferable, particularly when we use plexiglass. I clean the board with a wet cloth twice and then finish it up with a slightly wet cloth (i.e., I clean it three times).
Supplemental lighting
The LED strip light is a day-white light and makes our skin color whitish and unhealthy. We might want to have extra lighting on ourselves with a warm-white lantern and make our skin color more natural and healthy. I use a small LED lantern from above during the lecture.
Headset
I do a live online lecture. I wear a wireless (Bluetooth) headset to answer the questions from the students during lecture. In practice, I use a headset to listen to the questions and a dynamic microphone to talk to the students.
Other gadgets
I use a table clock to track the lecture time and a tablet device to see how the lecture appears on the students' screens. I place a table between the side poles of the lightboard (under the transparent board). I put various lecture gadgets there. If you install a tablet device just behind the webcam with a tripod, you can look at the webcam and see your online lecture at the same time.
Lecture dressing
Plain and dark color clothes are preferable to make the characters and figures on the lightboard more visible. I wear a navy-blue shirt and black or navy-blue jeans. Be careful not to touch clothes during the lecture because our hands get white with marker ink powder.
A practical illustration of live online lecture with a lightboard
I record my live online lectures so that students can review or catch up later (the recorded videos are only accessible to the students who register my class). In practice, I repeat the following process in the lecture: 1) write up a sheet of chalk talk; 2) stop the recording of the lecture; 3) clean the lightboard; 4) start a new recording and 5) continue the chalk talk. I usually spend between 70 and 75 minutes and write between 6 and 8 sheets of chalk talk in a 90-minute lecture. One lecture produces between 6 and 8 video recordings. The total recording time is between 55 and 60 minutes. The difference between the lecture time (70-75 minutes) and the recording time (55-60 minutes) correspond to the time to clean the lightboard between chalk talks. It takes two or three minutes to clean it, during which students can review and organize their note-taking.
I cut off the unnecessary parts from the original recordings with video editing software (e.g., DaVinci Resolve, Adobe Premiere) before uploading them to the LMS. The recording time of the uploaded video is a bit shorter than the original. It takes 3 or 4 hours to edit the original recordings and upload them to the LMS for every lecture, most of which time is spent saving the edited videos. Editing time depends on the PC we use for editing.
I teach online by myself without a recording assistant, by the way.
Afterword
The first lightboard is introduced by Prof. M. Peshkin at Northwestern University, IL (https://lightboard.info/) in 2013. I learned about it around 2014-15 and thought it was a large installation for organizations or teams to record MOOC videos. The original lightboard and its direct spin-offs require a studio with a video camera, mirrors, lighting control, video editing equipment, etc. (and often recording/editing assistants, too). It was/is difficult for an individual to build, install and operate a lightboard as an individual.
I remembered the lightboard last spring because I had to prepare for my online class in the fall semester of 2020. I studied, designed, and built a prototype during the summer recess. I came up with the idea that I could cut the production cost significantly by using online conference software (Zoom) and broadcaster software extensively. In fact, I cut the cost to less than $200 and can teach online with the lightboard from my office by myself. I don't need studio-grade lighting or a recording assistant to teach online.
The lightboard has the appeal of literally face-to-face online teaching, which would be challenging to attain with other digital tools such as a pen tablet or iPad/android tablet. However, the operation cost (equipment, recording assistant, room space, etc.) and initial production cost have been a significant barrier to the spread use of the lightboard. So the use of the software is just a small tweak, but I think it encourages more people to start using the lightboard widely and casually.
If you have any questions, please contact me from here. However, I may not necessarily be able to answer all questions. I may just update the webpage to "answer" them instead. Come back to the webpage some time later; you may find the answer(s) to the question(s).